Get a public HTTPS URL for your local server on your own domain - no port forwarding, no firewall changes. Even on the free plan. No credit card required.
1 custom domain free·No credit card required·Works behind firewalls·HTTPS by default·Unlimited requests on every plan
Bring your own domain.
Point any domain at your tunnel. tunnelto handles DNS verification, certificate issuance, and routing automatically. Start free, then scale up when you need more.
$ tunnelto add api 8080
✓ Tunnel active: https://api.tunnelto.me
$ tunnelto add api.mycompany.com 8080
✓ DNS verified
✓ Certificate issued
✓ Tunnel active: https://api.mycompany.com
1 custom domain is included on the Free plan.
How tunnelto compares.
Most localhost tunnels make custom domains a paid feature. We don’t.
tunnelto
ngrok
Cloudflare Tunnel
localhost.run
Custom domain on free plan
✓
×
✓
×
HTTPS by default
✓
✓
✓
✓
No credit card to start
✓
✓
Cloudflare account
✓
Persistent URL on free
1-hour tunnels, unlimited
Random URL each run
✓
Random URL each run
Works behind NAT / firewalls
✓ outbound SSH
✓
✓
✓ SSH
Native binary, no runtime
✓
✓
✓
SSH only
Built-in tunnel auth
✓ Bearer + Basic
Paid plans
Cloudflare Access
×
Static content hosting
✓
×
×
×
Compared on publicly documented features as of April 2026. We’ll update this as competitors evolve.
Install via Scoop package manager. Runs natively on Windows.
Everything you need to go live locally.
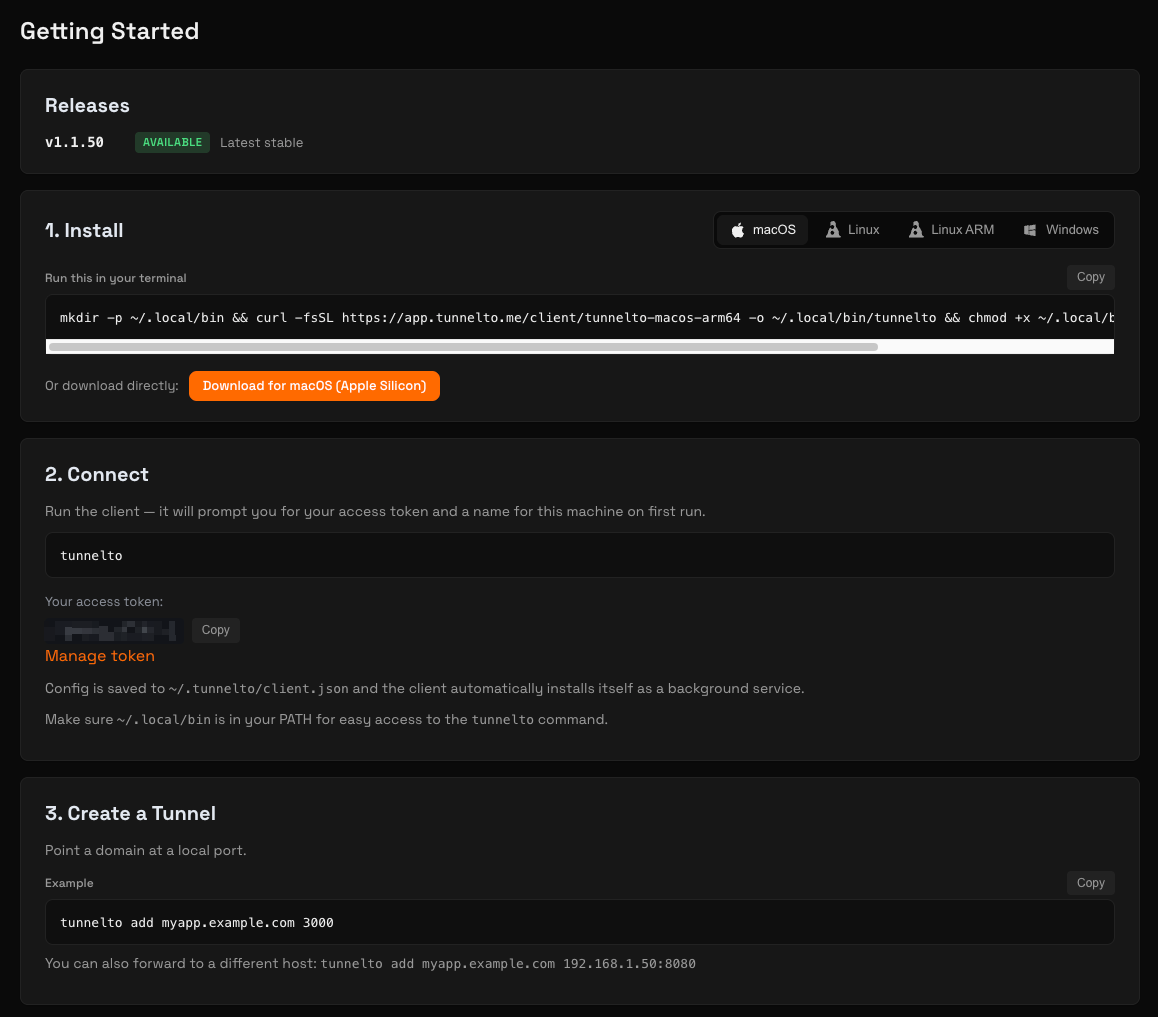
Up in seconds
One command to install, one command to connect. No config files, no Docker, no infrastructure.
Custom domains
Use your own domain or a *.tunnelto.me subdomain. tunnelto handles certificate issuance, DNS verification, and wildcard routing automatically.
Protected endpoints
Lock down tunnels with bearer tokens or Basic Auth. Credentials are bcrypt-hashed and never forwarded to your upstream service.
Static content hosting
Serve HTML, CSS, and assets directly from a folder. No local server needed. Simply point a tunnel at a directory.
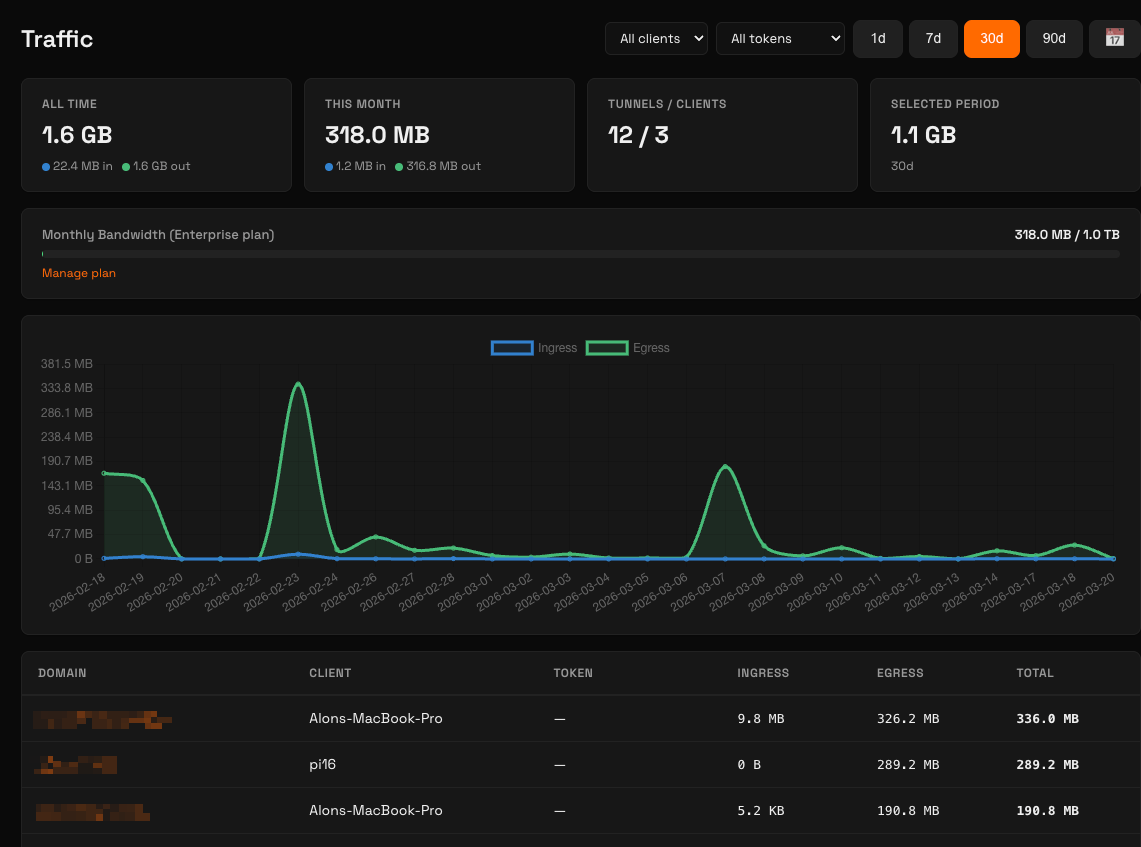
Traffic insights
See real-time bandwidth usage, request counts, and per-client breakdowns. Know exactly what’s hitting your tunnels.
Webhook testing
Receive webhooks from Stripe, GitHub, Slack, or any service that needs to reach your machine.
Live previews
Share a working URL with clients and teammates. No deploy needed. Show your work in progress.
Firewall-friendly
Outbound SSH connection punches through NAT and firewalls. No inbound ports needed.
HTTPS by default
Automatic TLS certificates. Zero configuration, zero cost, zero expiry headaches.
WebSocket support
Run wss:// connections through your tunnel for live dev servers, chat apps, and real-time dashboards. See the FAQ for the recommended setup.
Raw TCP tunnels
Tunnel Postgres, Redis, SSH, MQTT, game servers, or anything else that speaks raw TCP, not just HTTP. Configure it per tunnel from the dashboard.
Wildcard DNS
Route any subdomain (*.dev.acme.com) to your local server. Perfect for multi-tenant testing, branch previews, and per-feature subdomains.
Run as a service
Install once with tunnelto install-service and your tunnels run as a managed system service on launchd, systemd, or Windows. Survives reboots, restarts on failure.
Tunnel any LAN host
Run tunnelto on one machine and forward to any other host it can reach: a Raspberry Pi, a Docker host, a VM. Pass host:port instead of just a port. The target machine doesn’t need tunnelto installed.
Detailed traffic insights
Monitor bandwidth, request volume, and per-client usage in real time. Spot anomalies before they become problems.
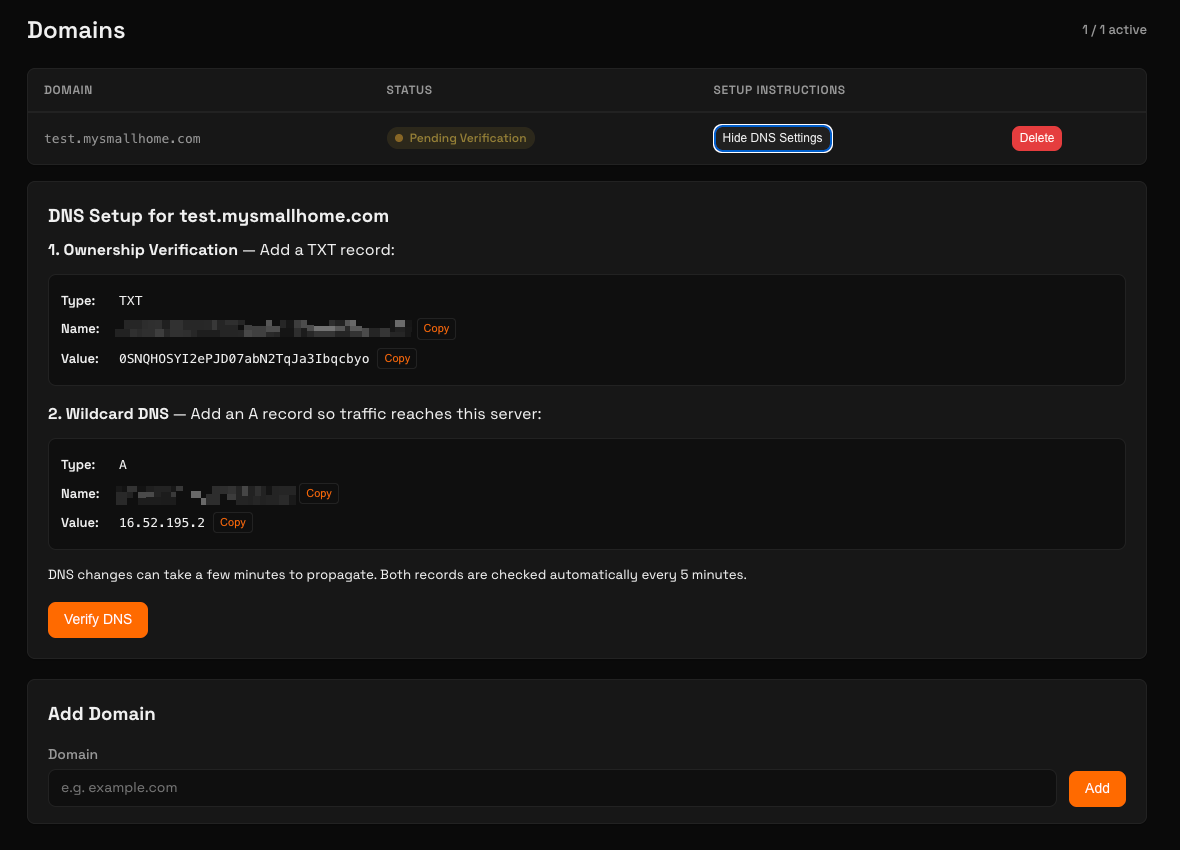
Bring your own domain
Point any domain at your tunnel with guided DNS setup. Ownership verification and wildcard routing included.
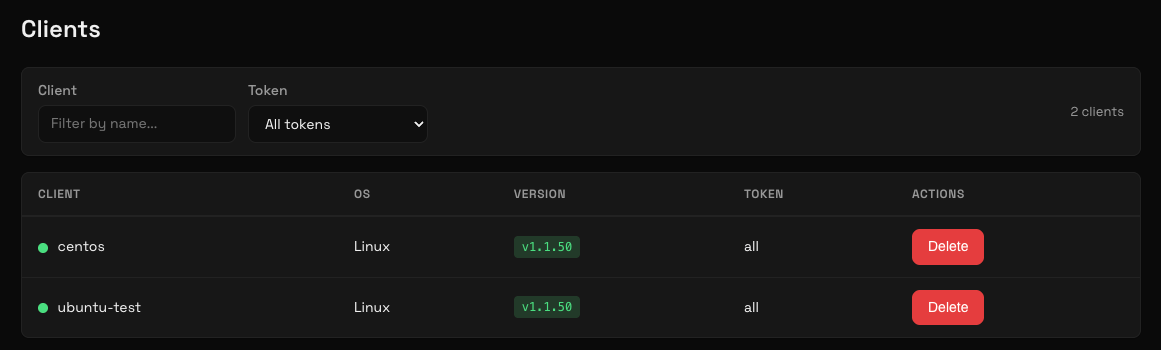
Multi-platform clients
Manage all your connected clients from one dashboard. See OS, version, and status at a glance.
Three steps to go public.
1
Sign up
Create a free account and download the client for your OS.
2
Create a tunnel
Pick a domain and point it at your local port through the dashboard or CLI.
3
Share
Your local service is live on a public HTTPS URL. Share it with anyone.
Simple, predictable pricing.
No per-request fees. No surprises. Unlimited requests on every plan.
Each tunnel uses a dedicated SSH key with restricted authorized_keys options. No shell access, no port scanning. Only the specific tunnel port is exposed.
End-to-end TLS options
Choose client-side TLS termination so the server never sees your plaintext traffic. Or let the server handle certificates automatically.
Tunnel authentication
Protect tunnels with bearer tokens or Basic Auth. Credentials are bcrypt-hashed and never forwarded to your upstream service.
Tenant isolation
Users can only see and manage their own tunnels, domains, and traffic. Cross-tenant data leaks are blocked at every layer.
Yes. tunnelto gives you a public HTTPS URL for your local server with no credit card required. Unlike ngrok’s free tier, tunnelto’s free plan includes 1 custom domain. You can point any domain you own at your tunnel and get automatic TLS certificates. Free tunnels stay alive for one hour at a time and you can create unlimited tunnels.
Can I really use my own domain on the free plan?
Yes. The Free plan includes 1 custom domain at no cost. tunnelto handles DNS verification, certificate issuance, and routing automatically. Most competitors gate this behind a paid tier. We don’t.
What’s the difference between the Free and Hobbyist ($2/month) plans?
Both plans include the same 1 GB of monthly bandwidth, the same 5 Mbps speed, the same 100 req/min rate limit, and 1 custom domain. The single difference that matters: free tunnels expire after 1 hour and you have to re-create them, while Hobbyist tunnels are persistent. They stay up across reboots, restarts, and overnight breaks. Hobbyist also gives you 3 free *.tunnelto.me subdomains instead of 1.
If you want a tunnel URL that’s still alive when you come back to your laptop tomorrow (think long-running webhook receivers, OAuth callbacks, shared previews), Hobbyist is the $2 upgrade. If you’re actively connected during dev sessions and don’t mind re-running the command, Free works forever.
How do I receive Stripe, GitHub, or Slack webhooks on localhost?
Install tunnelto, run tunnelto add <your-domain> <local-port>, and paste the resulting HTTPS URL into the webhook configuration of Stripe, GitHub, Slack, or any other service. Webhooks hit your tunnel and get forwarded straight to your local development server. The connection is outbound SSH from your machine, so no firewall changes or port forwarding are needed.
Does tunnelto work behind a corporate firewall or NAT?
Yes. tunnelto uses an outbound SSH connection from your machine to our servers, so it works through NAT and most corporate firewalls without any inbound port forwarding or router changes. If your network blocks all outbound SSH (port 22), tunnelto can also connect over standard HTTPS ports.
Is my traffic secure?
All tunnel traffic is encrypted end-to-end. Public HTTPS is enabled by default with automatic TLS certificates. You can also enable client-side TLS termination so the tunnel server never sees your plaintext traffic. Tunnel authentication credentials (bearer tokens, Basic Auth) are bcrypt-hashed and never forwarded to your upstream service.
What platforms does tunnelto support?
Native binaries are available for macOS (Apple Silicon and Intel), Linux (ARM and x86_64), and Windows. No Docker, no runtime, no dependencies. Just a single binary. Install on macOS or Linux with one curl command, or via Scoop on Windows.
How is tunnelto different from Cloudflare Tunnel?
Cloudflare Tunnel is powerful but tightly coupled to the Cloudflare ecosystem. You need a Cloudflare account, Cloudflare DNS, and you’re working inside their dashboard. tunnelto is purpose-built for local development workflows. Install in seconds, point any domain (on any registrar) at any local port, and you’re live. Persistent tunnels start at $2/month.
Can I use tunnelto for production traffic?
tunnelto is built for development, demos, webhook testing, and live previews, not as a long-term production reverse proxy. Plus, Pro, and Enterprise plans support persistent tunnels and higher rate limits if you need a stable URL for staging or internal services. For high-volume production workloads, talk to us about Enterprise.
Can I serve static HTML and assets without running a local server?
Yes. Point a tunnel at a directory instead of a port and tunnelto will serve files directly: tunnelto add demo.acme.dev /path/to/build. No Nginx, no Vite preview, no Python http.server needed. Useful for sharing static site builds, design mockups, or one-off file shares.
Can I tunnel to a service on another machine on my network?
Yes. tunnelto’s add command accepts a host:port target, not just a port: tunnelto add api.acme.dev 192.168.1.50:8080. Useful for tunneling to a Raspberry Pi, a Docker container on a different host, a VM, or a dev box on your LAN, without installing tunnelto on the target machine.
How it works: the tunnelto client process (the one you started with tunnelto add or as a background service) is what opens the connection to 192.168.1.50:8080. So whichever machine the tunnelto client runs on must be able to reach the target host on its LAN. The tunnelto server itself never touches your private network.
Can I run tunnelto as a background service that starts on boot?
Yes. Run tunnelto install-service once and tunnelto registers itself as a system service (launchd on macOS, systemd on Linux, Windows Service on Windows). After that, tunnelto start, stop, restart, and status manage it like any other service. Tunnels stay up across reboots.
Does tunnelto support WebSockets?
Yes. Set the tunnel’s TLS termination mode to server-tls in the dashboard. In this mode, tunnelto terminates TLS at the edge and forwards raw TCP to your local service, so the WebSocket upgrade passes through transparently. No header overrides needed.
Once configured, WebSocket clients (including wss://) connect through the tunnel just like any other HTTPS request.
Does tunnelto support raw TCP for non-HTTP services?
Yes. Tunnels can be configured for raw TCP, exposing a port directly for protocols other than HTTP. Useful for tunneling to Postgres, Redis, SSH, MQTT brokers, game servers, and other non-HTTP services. Configure it from the dashboard when creating or editing a tunnel.
Can I protect a tunnel with both Bearer tokens and Basic Auth?
Yes. A single tunnel can have both Basic Auth and Bearer Token authentication enabled at the same time. Programmatic clients (CI jobs, webhook senders, scripts) can authenticate with a Bearer token, while a browser falls back to the Basic Auth prompt. All credentials are bcrypt-hashed at rest and never forwarded to your upstream service.
I’m getting 502 errors. What’s wrong?
A 502 means the tunnel connected fine, but tunnelto couldn’t reach your local service. The quickest test is to open http://localhost:PORT in your own browser on the same machine running the tunnelto client. If that doesn’t load, tunnelto can’t reach it either, so fix it there first. The most common causes:
Service isn’t running on the port you passed to tunnelto add, or it’s on a different port than you thought. Double-check the line your dev server prints at startup.
WSL (Windows). If your dev server runs inside WSL, it’s usually not reachable at localhost from the Windows side. Either run tunnelto inside WSL too, or bind your service to 0.0.0.0 inside WSL so Windows can see it.
Docker / Docker Desktop. Containers need their port published to the host with -p PORT:PORT. host.docker.internal only matters from inside the container. Tunnelto runs on your host and talks to localhost.
Firewall or antivirus blocking loopback connections from non-browser processes. Temporarily disable to test.
Bound to a specific LAN IP. If your service is on, say, 192.168.1.50:8080 rather than localhost, pass host:port to tunnelto add, for example tunnelto add my.dev 192.168.1.50:8080.
Tunnelto’s 502 page also shows a targeted troubleshooting list based on your client’s operating system, so you don’t have to remember all of this.
Ready to share localhost?
Get a public HTTPS URL on your own domain in under a minute. No credit card required.